ONLY PROCEED IF YOU KNOW WHAT YOU'RE DOING
DON'T ATTEMPT TO RE-LOCK THE BOOTLOADER WHEN YOU MODIFIED THE BOOT IMAGE (Flashed Magisk)
I'M NOT RESPONSIBLE FOR ANY OF YOUR ACTIONS
THIS PROCESS WILL WIPE ALL YOUR DATA
It's easy to get it working again, if you are still on the SOS-G ROM, because it includes the gf_display_test App. If you are already on a custom ROM, you will have to install the gf_display_test.apk to /system/priv-app (with Magisk).
When the App is installed, make sure USB Debugging is enabled on the device, start a cmd Window in the directory of adb and execute
Requires an unlocked bootloader, follow "Bootloader unlocking Guide"
DON'T ATTEMPT TO RE-LOCK THE BOOTLOADER WHEN YOU MODIFIED THE BOOT IMAGE (Flashed Magisk)
I'M NOT RESPONSIBLE FOR ANY OF YOUR ACTIONS
Bootloader unlocking Guide
Preamble
Unlocking the Bootloader is required for modifying partitions on the device. This is required for gaining root access or flashing a custom recovery/ROM.THIS PROCESS WILL WIPE ALL YOUR DATA
Prerequisites
- a Linux/Mac/Windows PC (this Guide is intended for Windows 11 users)
- USB Cable
- SDK Platform Tools
- USB Driver
- Fastboot Driver - those install automatically via Windows Update when the device is attached while in Fastboot mode (make sure you have internet connection and enabled "Give me updates for other Microsoft products when I update Windows." in the Windows Update settings.
Guide
- download and extract the SDK Platform Tools into a folder on your drive root (e.g. C:\adb)
- download and extract the USB Drivers into a folder, open it and install the drivers via right clicking on the android_winusb.inf -> install
- boot up your device
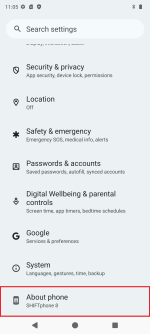
- open the settings app
- go to About phone
- tap on the Build number 7 times
- go to System
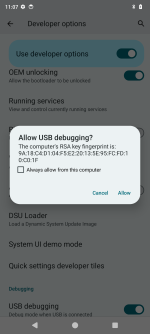
- go to Developer options
- enable OEM unlocking and USB debugging
- go to About phone
- navigate inside the folder you extracted the SDK Platform Tools to and bring up the cmd (click inside the navigation bar, type cmd and hit enter)
- type
adb devicesand hit enter - on the device, confirm the dialog with "Allow"
- type
adb reboot bootloaderand hit enter - after the devices has entered the bootloader, type
fastboot devicesand hit enter- if the device shows up continue
- if the device doesn't show up, open the Device Manager (devmgmt.msc) and look for an not correctly recognized Device (typically labeled "Android")
- right click "Android" -> Update Driver Software... -> Browse my computer for driver software -> Let me pick from a list of device drivers on my computer -> Show all Devices -> Have Disk... -> Browse... -> choose the downloaded android_winusb.inf -> Android Bootloader Interface
(guide with pictures)
- right click "Android" -> Update Driver Software... -> Browse my computer for driver software -> Let me pick from a list of device drivers on my computer -> Show all Devices -> Have Disk... -> Browse... -> choose the downloaded android_winusb.inf -> Android Bootloader Interface
- if the device shows up continue
- type
fastboot flashing unlockand hit enter
- on your device, select the "UNLOCK THE BOOTLOADER" option with the volume buttons and confirm with the power button
- reboot your device to the bootloader again (press and hold the power and volume up button or use adb)
- repeat the unlocking process but type
fastboot flashing unlock_criticalthis time - your device should reboot and the bootloader is unlocked
Fingerprint Sensor fix
After unlocking the bootloader, the Fingerprint Sensor will stop working.It's easy to get it working again, if you are still on the SOS-G ROM, because it includes the gf_display_test App. If you are already on a custom ROM, you will have to install the gf_display_test.apk to /system/priv-app (with Magisk).
When the App is installed, make sure USB Debugging is enabled on the device, start a cmd Window in the directory of adb and execute
adb shell am start -n com.goodix.fingerprint.setting/com.goodix.fingerprint.setting.SPMT1Activity- the goodix Fingerprint Sensor calibration App will start
- lay a cork (something flat with a skin-like color) on the sensor and press next
- lay something flat and completely black on the sensor and press next
- now you have to very quickly press next and the put a finger on the sensor
- the calibration will say it failed
- reboot the device
- the sensor should work again
Rooting Guide
Preamble
Rooting is the method of gaining the opportunity to modify partitions (from within the userspace).Requires an unlocked bootloader, follow "Bootloader unlocking Guide"
Prerequisites
- The same as for the "Bootloader unlocking Guide"
- Magisk - download it and copy it onto your device
- a Magisk-Patched boot.img
- Patch it yourself using Magisk
- download the matching FASTBOOT.tar.gz file for your OS version
- extract the boot.img from the FASTBOOT.tar.gz archive
- install the Magisk-v*.apk on your device
- Start Magisk
- Tap on "install"
- choose "Select and Patch a File" and select your extracted boot.img
- Wait for patching to finish, grab the patched boot.img and proceed with the Rooting Guide
- Patch it yourself using Magisk
Guide
- install the Magisk-v*.apk on your device
- boot into the bootloader (
adb reboot bootloader) - navigate inside the folder you extracted the SDK Platform Tools to, copy the Magisk-Patched boot.img into it and name it to magisk_boot.img
- bring up the cmd inside this folder (click inside the navigation bar, type cmd and hit enter) type
fastboot flash boot magisk_boot.imgand hit enter- if the process is stuck and won't display SUCCESS after about 30 Seconds, abort it in the cmd by pressing Ctrl + C and press the volume-down button on the device to select "Reboot Bootloader". Confirm buy a press on the power-button and try again.
- after it displayed SUCCESS you can type in
fastboot rebootand hit enter
- your device should reboot is now rooted
GSI (Generic System Image) Flashing Guide [UNTESTED]
Preamble
A GSI (Generic System Image) is an universal ROM which can run on every Treble enabled device. More InfoPrerequisites
- The same as for the "Bootloader unlocking Guide"
- The most recent Version of a LineageOS ROM ZIP
- payload-dumper-go
- product_gsi.img
- a GSI Image
- Type arm64_b
- extracted and renamed to system.img
- no version newer than the newest flashed LineageOS ROM because else some sensors won't work
Guide
- Install the LineageOS ROM following this Guide
- Extract the payload.bin from the LineageOS ROM ZIP
- Copy the payload.bin next to the payload-dumper-go.exe and execute
payload-dumper-go.exe payload.bin - Copy the following extracted files into a folder:
- boot.img
- dtbo.img
- recovery.img
- vbmeta.img
- vbmeta_system.img
- vbmeta_vendor.img
- Copy the product_gsi.img and GSI system.img you want to flash into the folder as well
- Copy the following Code into a flash.bat (change
fastbootto the path of your fastboot.exe installation)
Code:fastboot flash boot_a boot.imgfastboot flash boot_b boot.img fastboot flash dtbo_a dtbo.img fastboot flash dtbo_b dtbo.img fastboot --disable-verity --disable-verification flash vbmeta_a vbmeta.img fastboot --disable-verity --disable-verification flash vbmeta_b vbmeta.img fastboot --disable-verity --disable-verification flash vbmeta_system_a vbmeta_system.img fastboot --disable-verity --disable-verification flash vbmeta_system_b vbmeta_system.img fastboot --disable-verity --disable-verification flash vbmeta_vendor_a vbmeta_vendor.img fastboot --disable-verity --disable-verification flash vbmeta_vendor_b vbmeta_vendor.img fastboot flash recovery recovery.img fastboot reboot fastboot fastboot flash product_a product_gsi.img fastboot flash product_b product_gsi.img fastboot flash --disable-verification system_a system.img fastboot flash --disable-verification system_b system.img REM fastboot flash recovery_a twrp_shift6mq.img REM fastboot flash recovery_b twrp_shift6mq.img fastboot format:ext4 metadata fastboot format:f2fs userdata fastboot --set-active=a fastboot reboot pause - boot into the bootloader (by using Advanced restart / holding down the volume-lower button and power-button together)
- execute the flash.bat
 THIS WILL EARSE ALL YOUR DATA
GSIs
Custom ROMs
Anhänge
Zuletzt bearbeitet:

 .
.